Pages

Tuesday, August 3, 2010

Wire Wrap Tutorial Part 2

Hey again all you creative beauties. Thanks for hanging in there for part 2 :) Were you brave enough to start wrapping? Maybe printed it off for later reference? (like I tend to do) My mum ( the Baroness) said she printed it off and hung it on the fridge! WOOHOO my artwork is still on the family art gallery :)

I left off with finishing the weave that cages the focal piece. Let's tighten that weave up by gently pinching the double coils along each of the frames. This will help even out the spacing between the coils.
Bail and Embellishments
1. Remove the tape (or clamps) clean any tape residue.
2.Bend the two center wires straight up at the 'V; junction
3.With the front of the piece facing you, bend the front center wire toward you so it's now at a 90 degree angle from the piece.
4. Coil that wire around the base of the standing wire3 times. Snip, and tuck. You might have to file the end to smooth .

5. measure to four side tails to the same length, mark and snip so they are all the same.
6. Using the tip of your round nose pliers make a tiny loop facing downwards in the end of each of the 4 tails.
7. to form the swirl hold the loop (gently) in your chain/bent nose pliers and bend the wire around. Don't use the pliers to move the swirl (might leave marks) use the pliers only to hold, and use your fingers to bend. Finish all 4 swirls, and push to place them where you want them.
8.To make the bail for the chain, bend the last standing wire towards you at a 90 degree angle at the base of the coil. grasp that point with your round nose pliers and wrap the wire away from you to form the loop.

9. Keep holding the loop with the pliers and coil that tail around the top of the other coil once.Use the chain or bent nose pliers to pinch all 4 coils together. Then we are going to make another swirl with that tail, and push it down on the front in front of the coil on the bail.

So now what to you do with an UGLY spot? Small scratch/chip/weird drill spot on the focal? You can cover with further embellishments. Personally I won't sell this piece because the of the (big) ugly spot, but it was handy to use for this tutorial. To cover the ugly spot I made an 'S' shape swirl. Same process as above. Cut a 4 inch piece of the 20g wire and make the small loops at each end. One pointed up one pointed down. Then I loosened the very outer row on each swirl to be able to use the 24g wire to wrap it to the inner frame to cover the ugly spot. I did 3 wraps around each connection point, and snipped and tucked the ends.
Okay guys, that's it! :) If you try this out I would love to see your versions. Feel free to post pics on my facebook page or link here in the comments. I would love any feedback or questions you may have. Good luck!
Bright Creative Blessings, Theresa ♥

Thursday, July 29, 2010

Wire Wrap Woven Pendant Tutorial part 1

If you happen to wander into this post, please bear with me as I work out writing a decent tutorial. I have found that taking this many pictures is an exercise regime all by itself! So please feel free to comment any suggestions, or questions if I miss something. I would love the feedback.
Materials and Tools


masking tape or small clamps (which ever you find more convenient)
wire straighteners
bent nose pliers, or chain nose
wire cutters
round nose pliers
18 or 20 gauge wire (for frame)
24 gauge wire (for weave)
flat circular focal 
(this onyx was 1.5 inch in diameter)
one lap weight to keep you in your chair!

To get started with the frame I form the 20g wire around the outer edge of the focal. Leave just a hairline of space between the wire and the focal for wrapping. Cut the wire, leaving at least 2 inch tails at the top.
Next cut 2 more 20g  wires the same size as this first frame work and do a loose shaping of the circle. I find it easier to hold the 2 together and shape at the same time for continuity.At the bottom center give the 2 wires a slight pinch to create a soft point. The curves need to be slightly smaller than the original diameter..set each piece of new wire on the focal and push gently to shape with the face curve of the stone/ bead. These two wires will be taped in place at the bottom center. One on the front and one on the back. This will cage the focal when it's woven, and make sure the back is pretty too.


Make sure all the tails at the top of the tear drop shape are in front, center, and back order on both sides. looking at the front of the piece determine how far away from the focal you want the top of the teardrop frame point to be. hold the point there, and tape (or clamp) on each side (all 3 of the wires keeping them in order) right next to the 'V' junction to hold the point space in place.
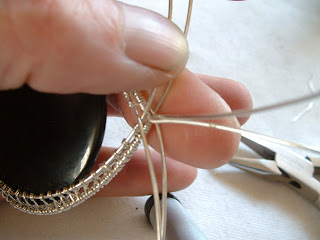
To start on the weaving I cut 2 pieces of the  24g wire approx 30 inches long. One for each side. I like to work both sides simultaneously in order to keep the shape , and tension true. At this point I work by holding the piece in hand, but some people might find a bench vice or clamp handy to hold the piece for them. If you prefer to use one of these tools, please use some padding or batting to protect your pendant from possible scratches.
To start weaving/wrapping we're going to go back to elementary school and use the old over / under technique we all used making goofy colored pot holders.
  1. Start at the top take  the 24 g wire and slide it under just the center frame wire leave an inch or so tail.
  2. wrap the 24g around that center wire 4 times to create a small coil. 
  3.  use the bent nose pliers to crimp the coil together and nudge to the top. We're going to leave the tail there to be able to hold the coil in place while we start the wrap
  4. whichever side the long end is on start by wrapping 'over' that side frame wire twice
  5. the pattern should be: over back wire twice, back under center twice,over front wire twice then back the other direction. alternating the over/ under.
  6. for now just nudge the wires close to each other with your thumb.
 Weave down about an inch and repeat the process on the other side to keep the tension balanced. At this point remove the the side pieces of tape. Clean any  tape residue from the wire and focal now. Continue weaving down each side. Depending on the size of your pendant you will have enough wire to meet both wraps at the center bottom. In my case I cut a third length to finish the bottom. If your wire breaks, or you need more length. Make sure you end on the center frame and leave a small tail. To start the connecting weave, wind your around the center frame wire at the bottom, lining up the wrapping wire at it's halfway point. Continue the pattern of weaving up both sides to end and meet on the center wire with 2 wraps where you left off

To finish the tails lay the wire over the center wire, and with the flat side of you cutters laying against the center wire, snip the wrapping wire leaving the tiniest fraction to tuck under the center frame wire. Use the tip of you bent nose or chain nose pliers to push that end under the frame wire to hide it. Do this with all tails.
So here's a good point to take a break and work the kinks out your fingers, and get some chocolate energy! Stay tuned for part 2 Embellishing, and the Bail. I will try to get the rest posted by tomorrow! :)
Bright creative blessings, Theresa

Saturday, July 24, 2010

Juggling Lemons

Tang and pucker. That acidic taste stuck at the back of your tongue for what seems like hours. Even as a small child, lemonade was never my favorite. Ok I admit it ..... The stuff makes me gag, ack, cough, cough, hork!


That oh so lovely saying, " when life gives you lemons, make lemonade" makes me cringe and shudder. Honestly I am just about to toss all the lemons out the door!  I need to come up with another saying altogether.

I found out this week after a lovely and adventurous half hour ride through the rolling hills of wheat to the nearest emergency room , that I am heart broken because of all that lovely lemonade. It's time to clean out the pantry so to speak. Oh joy, there's nothing I love better than cleaning! :)


After giving up a rather large amount of  my life blood, being wired for sound and video, and grilled under a spotlight. The conclusion was I was having a full blown anxiety attack. Now where the heck did that come from!? This is a completely new experience. I was tutored on the fine art of giving up caffeine (oh crap!) medications available, follow up Dr visits, and  the  wonderful advice of " avoid stress"....HA HA :D

 So the caffeine withdrawal headache only lasted a couple of days.  I have found a decent decaf bean to fake myself out in the morning. The dreaded appointments with Dr Frankenstein have been scheduled. Right now my stress reduction has consisted of taking naps, and not worrying about the house as I still feel residual droopiness. So all you beautiful women.....what do you do when you are stressed? Share your favorite stress reducers in comments. I would love to hear :) ( Oh and there is no way I'm giving up my dark chocolate!)
Be good to yourselves!
Creative Blessings, Theresa

Monday, July 12, 2010

Summer sale

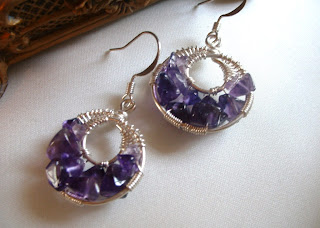
Just a bit of shameless self promotion today. I'm having a sale in Flightfancy for facebook fans and blog followers today only. I've been busy adding lots of new designs, and for some reason focusing on making new earrings.


50 percent off any one item for facebook fans and blog followers! Visit http://www.etsy.com/shop/flightfancy find your favorite fancy. Simply type FANCYFAN in message to seller upon checkout and I will refund 50% through PayPal,  or message me here or on etsy to send a revised invoice with your discount for convenient checkout! Sale price does not include shipping cost.  Sale until 12pm PST.
Have a wonderful and creative summer day!

Monday, June 21, 2010

Creative Cave Dweller

I find it's entirely too easy to skip blogging through my periods of spastic and constant obligations.(That and hiding in my cave on the in between) Thought I might crawl out of my cave for a moment and share some creativity.. For your perusal, a small pictorial tutorial . .......hmm does that sound a little too Dr Suess?
   A new wire wrap pendant........


  Wire Frame    18g                                                     

3 1/2" lengths with coiled ends
 Hammered
 Layout, 24g wrap lengths cut
wrap 4 connection points. Snip & tuck ends, and crimp coils together. I always cheek test. Rub piece against my cheek to feel for any possible snags.
The really fun part.....pick out, layout stones.
I look at it like coloring in the blanks.....I start my coils to meet up with the original connector coils. 
I'm sure there's some technical names for the techniques I play with, but since I'm basically self taught, and experimenting as I go, please forgive my lack of exact vocabulary.

I always go back over with my favorite bent nose pliers to crimp all the coils together once every end is tucked, Last step is pictures, and hoping someone has a similar sense, or aesthetic to want to purchase my odd little bits of whimsy.
 Well That's about it for my workings....:) now back to the cave. (hmm create or get lost on facebook?)

Bright Creative Blessings!
  Theresa